

 With recent injuries reported, it’s time to take a look at the proper technique of operating a top-handled chainsaw from a rope and harness or elevated work platform (EWP).
At Training For Trees we have been excited to continue with trials and evaluations of a newly developed chainsaw. It has a unique water-lubricated chain and ample ability to sever/prune tree roots up to 60cm below ground. We tested it in various situations and it performed so well it is now in full production.
Unfortunately we recently heard about two top-handled chainsaw related accidents and injuries. Both incidents involved top- handled saws with climbers working from a rope and harness within the tree canopy. The first incident was a kickback that happened to a climber who was working in a tree and slipped. The chain, which was slowing down but still spinning, cut his left hand knocking off a couple of fingernails which although painful could have been a lot worse.
The second incident involved a climber who was blocking down a stem section and pushing off the blocks into the yard below. As he was finishing the cut he used his left hand to push off the block with the saw in his right hand cutting. The saw connected with an adjacent branch and kicked back activating the inertia brake, but the force of the bar and chain hitting his face resulted in a nasty cut to his nose and top lip that required a trip to Emergency and resulted in a lot of stitches. For the record, he was wearing a conventional helmet with a peak and mesh visor which softened the impact. He believes if he had not used a steel mesh visor the injury would have been far worse!
Having considered the circumstances of these incidents I am going to discuss some of the issues and requirements for the safe operation of the top-handled chainsaw.
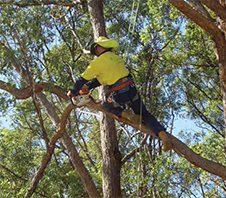
Top-handled chainsaws are powerful but light, compact, and easy to use up in a tree from an EWP or rope and harness.
Over the years there have been a number of incidents involving top-handled chainsaws due to incorrect use – such as poor work positioning and one-handed use – and from being used for trimming and cross-cutting on the ground.
In general, manufacturers state in the operator manual where and how these professional top-handled chainsaws are to be operated. I would like to quote an extract from the STIHL Operators Handbook: ‘These chainsaws may be used only by persons trained in special cutting and working techniques and who are properly secured by working in a tree (lift bucket, safety harness). Normal chainsaws (with wider spaced handles) are recommended forallothercuttingworkatgroundlevel.’
I notice these top-handled chainsaws are sometimes used on the ground to fell small trees and trim and cross-cut materials, and more often than not they are being used one-handed. This is not what they are designed for. Even if used with two hands, on the ground the operator is in a very poor position leaning over the saw, often directly in line with
the bar and chain. These are powerful chainsaws that can react extremely quickly and if used one-handed have proven to cause injury from kickback.
Below are tips and guidelines on how to use a top-handled chainsaw, whether from a rope and harness or an EWP.
Preparation
- Carry out a risk assessment prior to commencing work
- Personal protective equipment (PPE) similar to ground chainsaw use must be worn as well as a helmet with a chin strap when working above ground level
- The saw must be properly maintained, with the chain sharp and correct tension
- Safety features are all present and working
- Condition of lanyard attachment point is secure
- All nuts and bolts are checked for tightness
- Condition of lanyard is good
Starting The Top-Handled Chainsaw On The Ground
Ground crew should start and warm-up the saw prior to sending it aloft.
- Saw should be started on the ground with the right knee on the top handle and the left hand on the front handle
- Chain brake is engaged
- Pull the cord with the right hand
- Check the chain does not rotate at idle
- Check that the kill switch works
- Check the chain lube
- Attach the saw to the climber’s rope. Use a marlin spike hitch or similar
- Vacate the area under the tree until the climber has secured the saw to the harness
The area under the tree must be kept clear until the climber has attached the saw to the harness or the EWP bucket using the lanyard and locking carabiner to secure the saw onto a tool ring and not a spring clip.
Preferably, the climber should attach the saw securely to the harness before disconnecting it from the line used to send it aloft to reduce the possibility of dropping the saw.
Starting The Saw In The Tree
- There are three recommended starting methods, all of which the chain brake must be engaged at all times. Left hand on the front handle, pull the cord with the right hand while keeping the left arm straight and locked, ensure the saw does not rotate towards the body
- Right hand on the top handle locked at the elbow, pull the cord with the left hand
- If working in a dense canopy wedge, place the saw in a fork, under a limb or between the knees, hold the front handle with the left hand and pull the cord with the right
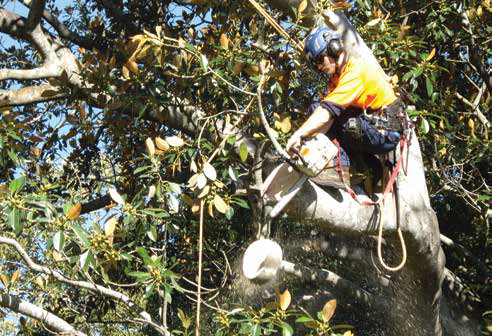
Saw Use And Work Positioning Within The Canopy
The use of a rope and harness in tree work is all about being supported in the correct working position. You should always strive to attain the best position before you start cutting to ensure both handles can be held while using the saw for maximum control.
To achieve the best position it is recommended that whenever the saw is cutting, and certainly where there is a risk of uncontrolled movement such as a pendulum-type swing, the climber must be secured using two anchor points both of which must be strong enough to support the full weight of the climber in the event of a fall. This can be achieved by using both ends of the climbing line, wire core flip line or an auxiliary lanyard. Two separate lifeline systems can also be used.
When working, the saw should not be used above shoulder height and both hands must be on the handles, right hand to control the throttle and the left hand holding the front handle.
You should be able to use the saw on both sides of your body without swapping your hands over if you adopt a good position prior to cutting relevant to the angle of the branch being cut.
One-Handed Use
In certain circumstances it may be necessary to use the top-handled saw in the tree one-handed.
This should only be carried out if you are working at the extremity of a branch or need to support the anchored position using the left hand where support cannot be obtained with the climbing line and anchor points, and only if the saw can be used at full reach and at a right angle to the climber’s position.
This is only in extreme circumstances and should not be considered as the normal mode of operation.
The likelihood of kickback skating along the limb and the swing back arc of the saw must all be considered.
This practice must not be considered as an excuse for poor work positioning and must only be used where necessary. The saw must not be used above shoulder height.
When removing large, heavy limbs there is a risk of the saw jamming in the cut and removing both the saw and operator along the way!
It is important to consider the use of the correct cuts and branch removal techniques, such as making sure step cuts are placed in the correct order.
In the case of large section removal it is advisable to disconnect the saw lanyard from the harness and connect it to the tree, making sure of course that it is inboard from the section to be cut!
Cutting Techniques
There are five basic cutting techniques that apply to almost all chainsaw operations within the tree canopy:
1. Step Cut
Outboard Step Cut – For lateral branches begin by making an undercut approximately one-third of the branch diameter and ensure the bar tip is clear to avoid kickback. Make the top cut at least 25mm outboard of the undercut but parallel to it. Do not cut all the way through the branch, it should drop flat.
Inboard step cut – If the branch is heavy and there’s a risk of the saw being taken with the branch then follow the steps above but make the release cut on the side closest to the main stem.
2. Scarf Cut Free Fall
This cut can help give a degree of control and branches can be steered slightly to avoid obstacles or into the drop zone.
Make a scarf cut of similar proportions to a normal felling cut about quarter diameter on the underside of the branch, or at an angle along the lower side at around the five or seven o’clock position if you want to turn it slightly.
The back cut is made in line or just outboard of the scarf cut.
Retain a parallel hinge for a vertical drop, or if attempting to turn the branch leave a thicker hinge on the upper side of the back cut.
3. Hand-Held Step Cut
This is used for smaller, easily managed horizontal sections.
First, cut from the top to about one-third of the branch diameter. Then cut under about 25mm away up to and overlap the top cut. The saw should be switched off and, lowered on the lanyard allowing both hands to grip the cut section. Break it off and cast it into the drop zone.
If the cut will not break re-introduce the chainsaw or if you use a hand saw to finish you can hold on to it at the same time.
4. Vertical Hand-Held Step Cut
Similar to the third technique above but for use on sections that require more control, the step cuts are made with the saw vertical. The proportions are still the same but the holding wood is in a vertical line which will hold the section but enable the operator to switch off and lower the saw on the lanyard. Grasp the section with both hands, apply sideways force to break it free that it can be thrown into the drop zone.
5. Scarf Cut Hand-Held
Make a scarf cut on the top of the branch. Make the back cut on the underside opposite to the scarf, cut to leave a parallel hinge. This may need to be thinner than the scarf cut free fall.
Switch off the saw, lower it on the lanyard and break the cut section upwards. Finally cast it into the drop zone.
Don’t forget to have a work plan agreed with the ground crew and give them a clear warning before you drop sections.
Try and avoid twisting too far and only cut sections that are manageable.
Consider using a hand saw to finish the final cut.
Please take note of the guidelines in this article: position yourself well in the canopy, use both hands to hold the saw while working and ensure you and your staff are trained, certificated and proficient.
The below units of competency include the above ground use of chainsaws in a tree:
- AHCARB307A Undertake complex tree climbing
- AHCARB305A Remove trees in confined spaces
- AHCARB304A Fell trees with advanced techniques
- AHCARB310A Perform aerial rigging
Consider your strategy for training and how you can keep your existing qualifications up to date.
Within the current WHS legislation there is a general obligation for everyone in the workplace, with a major emphasis on everyone, to act with due diligence.
This translates to mean the care that a reasonable person must exercise to avoid harm to themselves or others in and around the workplace. It is a pretty open-ended concept, placing obligations on everyone while they are at work including employers, the self-employed and employees, with the general requirement to carry out their duties. As responsible operators it is also a requirement for everyone to receive training for their roles and to be deemed competent and current in their required skills.
One way to demonstrate compliance with these requirements is to attend regular training and update courses which are designed to maintain essential skill levels. Regular refresher and update training and assessment programs to suit relevant skills as required are offered by Training For Trees. Attending these sessions is an effective way to ensure bad habits are identified and rectified with further training.
Persons that are trained and certificated generally have a greater understanding of operations and the required outcomes. The end result is usually seen in less downtime and maintenance requirements and ultimately in the reduction of accidents and injuries.
“Everyone engaged in carrying out work with trees must be trained and qualified in their designated task and strive to maintain and improve their industry currency by continuing to gain relevant experience and qualifications”.
Training is as important as the servicing of vehicles and machinery, after all, workers are the machinery required to operate your business. It has been proven that independent training and assessment increases staff retention, safety, awareness, productivity and efficiency. Remember to schedule regular refresher and update training sessions.
For full trade level qualifications and apprenticeships to meet the industry standard requirement to be classified as an arborist/tree worker you will need to undertake AHC20513 Certificate II in Arboriculture which is a good pathway to follow towards becoming a qualified working arborist and undertake the AHC30810 Certificate III in Arboriculture. Funding incentives currently apply to eligible applicants and their employers in QLD.
“Safety Rules!”
Check out your eligibility for funding. Enrol now for Cert II and III in Arboriculture. Chainsaw (all levels), First Aid, Working at Heights, Polesaw, and AC/DC are now booking. Contact Training For Trees for your short course RPL or refresher training needs. Visit www.trainingfortrees.com.au or email info@trainingfortrees.com.au for more details.